Pages

Thursday, December 22, 2011

Introducing - Prep Steps!

As I've spent more and more time cooking for my family, I've discovered that most of my time is spent on prep work. Actually cooking the meal? That's easy! It's the prep that takes the time. That's why all those TV chefs make everything look so effortless and "dinner in under 10 minutes" and all of that. They have everything cleaned, chopped, pre-measured and ready to throw in the pan!

I've started a category here at DBITK called "Prep Steps" - and hopefully the posts in that folder will help you think about the ways you can capitalize on the amount of time you spend in the kitchen actually preparing a meal. The more steps you have completed ahead of time, the more enjoyable cooking could be, would you agree? It also means more time to spend doing other things you love.

If you've thought about subscribing to DBITK, now's a good time. Learn to be a happier chef and let Prep Steps be a new habit for 2012!

Who's with me?

Friday, December 2, 2011

Mashed Potato Cakes

I've been wanting to do something creative with leftover mashed potatoes for a while now. The hubs is great with leftovers, but if there's no gravy, who wants to eat plain leftover mashed potatoes? I do freeze them and mix them in with fresh ones later on - but why not make a potato pancake out of them and mix in some fun ingredients to make something interesting?

After scouring the internet yesterday for ideas, I came across this recipe on AllRecipes.com. My cheese-loving family needed something more, so I changed it up a bit and this is what came up a winner at last night's dinner!

3 cups leftover mashed potatoes
2 tbsp butter
1/2 onion (or to taste) finely chopped
1 cup shredded Mexican cheese blend
2 eggs
1/4 cup flour
salt & pepper to taste
Optional: hot sauce (I used Crystal) - a dash, or lots more if you like a bit of spice.

Preheat oven to 375 degrees. Saute the onions in butter on med-low heat until soft. Beat 1 egg in a large bowl, then add potatoes, flour, cheese, onions w/the butter they were cooked in, salt, pepper and hot sauce. Mix well, and form into 6 patties. Place patties on a lightly sprayed baking sheet. Beat the second egg in a small bowl with a little bit of water to make and egg wash for the patties. Brush each patty with a thin layer of egg wash, and then bake for 20-25 minutes, or until cooked through.

This makes a great side dish - we served it with chicken wings!

What are some ways you can make this idea work for your family? Comment below and let me know what you came up with!

Monday, November 28, 2011

Classic Pillsbury Ad

With a site titled "Dumb Blonde in the Kitchen" - how could I NOT share this?

Monday, November 21, 2011

Freezable Festive Cranberry-Orange Relish

A must-have in your freezer in order to serve at other times of the year, as fresh cranberries aren't available year round - so stock up!

12 oz. whole cranberries
1 seedless orange
1 cup light brown sugar
1/2 cup chopped walnuts

Rinse cranberries. Cut orange into 6-8 wedges, leaving the peel on. Run the cranberries and the orange wedges through a food processor together until nicely ground up. Dump cranberry-orange mixture into a large bowl and stir in the brown sugar and walnuts. Chill and serve. To freeze, scoop into a ziplock freezer bag (or use a vacuum sealer), remove as much air as possible, label and freeze. I've had this stuff last 6-8 months and it was still yummy. I'll bet it might even last longer.

Saturday, November 19, 2011

How to prep and cook a large field pumpkin

You know - a large field pumpkin? The kind that your kids turn into Jack-O-Lanterns for Halloween? Yea, those field pumpkins. This one weighed in at over 20 pounds. 

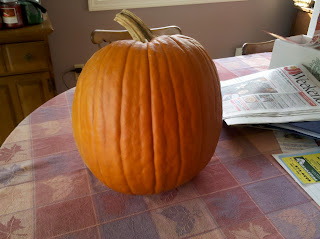
I've always been a bit fearful of large food items. I mean, look at the size of this thing! Where do you start? Anybody can dispatch one of those little baby sugar pumpkin dealies - but it takes a real woman to hack up one of these monsters.

This year, I rose to the occasion.

I knew from many years of Jack-O-Lanterns that large pumpkins are essentially hollow, and that tiny little serrated safety knives carve out nice little shapes fairly easily. I didn't have one of those pumpkin carving thingies, so I first tried a serrated steak knife. OK - twirling my hair that was dumb. How on earth was I going to cut this thing up in order to cook it properly? Answer - any way I can. :)

This next photo shows my tools of necessity choice. Thank-you to all you foodies for recognizing my lovely Wusthof knives...but I digress. I did not take the top off first and scoop out any goo - rather I stabbed the thing with my serrated knife (the one in the middle) and sawed a big wedge out of it. It wasn't pretty, but I had a wedge out in no time. I didn't even have to be accurate, when I got close to the end I just wrestled and ripped the thing away. Then it was easy to take the same serrated knife and slice along the inside of the wedge to remove all the seeds and slimy pumpkin-ick.

My goal with this pumpkin was to make batches of puree to use in recipes. I decided it was better to remove the skin before putting it in the oven whereas you would perhaps bake a sugar pumpkin or a butternut squash with the skin on and then scoop out the flesh afterwards. Squash separates from its skin easily that way - pumpkin does not. I was either going to take the time to peel it first, or struggle with scooping out pumpkin with bits of hard, yucky skin attached later. How do you remove the skin of a pumpkin? Not with a peeler, I'll tell you that! Pumpkins don't have skin, they have freakin' armor! Cutting the wedge into 2-3 smaller pieces helped me to handle it while I whittled the skin away with a combination of my paring knife (the little one on the right) and my serrated knife. When I got most of the skin off, I could then take a peeler and whisk off the little remaining bits. I finally got to use my favorite chef's knife (the baby on the left) to slice the pumpkin into 1/2" - 3/4" slices.

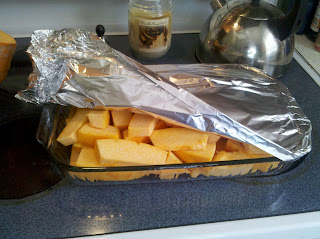
Next step is layering all those slices in a baking dish - I chose a 9x13 glass dish. No need to grease the pan or add any water. Pumpkin has a fair amount of moisture that will cook out of it at it bakes, and it will not stick to the dish. Fill up the pan (what you see pictured is approximately 1/3 of that pumpkin), cover it tightly with foil, and bake at 325F for an hour and 1/2, or until the pumpkin is fork-tender.

After it cools, it's ready to puree! Cooked pumpkin is super easy to freeze this way - just a simple Zip-Loc freezer bag and 2-cup increments. Make sure all the air is pressed out and you label the bag. Freezer tip - press the bags flat and freeze them stacked on top of each other to save space and enable quick thawing later. Frozen pumpkin puree can be used in any recipe you'd normally have used canned pumpkin - except it will taste 1,000,000 times better and save you a heap of cash. Canned pumpkin is expensive!

So, this holiday season, why not try some homemade pumpkin soup, pumpkin risotto, pumpkin muffins, pumpkin bread, or how about FRESH pumpkin pie? Comment, please, and let me know how you made out!

Happy Thanksgiving everyone!


Tuesday, November 8, 2011

Nothing like a power outage to make you clean out your freezer!

Winter storm Alfred not only left its mark on CT - it left its mark on my freezer! Thank goodness I didn't have the thing stocked to the brim as I normally would this time of year. Since I packed my kids up and went to Cape Cod for the week during the power outage (leaving my husband alone in the cold and dark) I also packed two coolers full of my most expensive freezer items - roasts, steaks, ribs, etc. Happily, not a lot went to waste, and we ate really well that week. However - now I'm tasked with restocking not just my fridge, but my freezer as well.

Yesterday, I made a double batch of pancakes to celebrate our being together again as a family eating a hot meal in our own home. I had 8 pancakes leftover, so I wrapped them individually and froze them - and now Jonathan & Delci can have their pancakes any time they want by just popping them in the toaster.

Today I started with a few small convenience foods for Igor and for Glen. Igor loves baked oatmeal, so I made a batch for breakfast and froze 2 containers (Gladware soup/salad sized) for him to thaw and reheat another day. The recipe is here, and it's worth making just to keep smaller portions in the freezer for later convenience.

For Glen I made a lunch of chicken noodle soup that we had for dinner the other night, and also a lunch of spaghetti and meatballs that we had for dinner last night. I froze both of these in entree-sized Gladware containers. He eats well at work, and we save a boatload of cash when he does. Win-win!

See - not every freezer cooking session has to be a big to do. Start small and freeze smart. Every little bit helps, and in no time you'll be filling your freezer with foods that your family loves and will enthusiastically eat on a regular basis.


Sunday, October 16, 2011

Freezing rice

I really should start a series on making and storing your own convenience foods, but it would be an incredibly long series. More than likely, it will be what this blog will eventually become, but for now - let's talk about rice!

Rice is one of those things that cooks up easily, will take on the flavors of pretty much anything you mix into it, and stores incredibly well in the freezer. It can be boiled, steamed, fried, baked - you name it, you can do it with rice.

For the sake of simplicity, let's just talk about preparing and storing white and brown rice for use later in recipes or as a simple side dish in and of itself.

Step 1) Cook the rice. If you have a rice cooker, this will be much easier!
Step 2) Let the rice cool
Step 3) Place the rice in freezer bags in meal-sized or whatever sized portions you use in recipes, remove the air, label and freeze.

Too many chemicals, too expensive!
Thaw and prepare in whatever way you use and serve cooked rice! You've saved yourself a very time-consuming step here in meal preparation by having cooked rice on hand in the freezer ready to go.

Can you prepare a rice dish, fully seasoned, and freeze it for even more time savings? Absolutely! Fried rice, rice & cheese casseroles, rice prepared in broth and spices - you almost can't miss. Prepare your own rice dishes from fresh ingredients and freeze them for convenience. You'll never go back to those silly, expensive rice packets again!

Thursday, October 13, 2011

What I froze today

It wasn't much, but I managed to score some bars of Cracker Barrel cheese on sale, so in addition to making my famous "big mac & cheese" casserole for dinner last night, I bought extra and froze a meal-sized portion of pre-sliced cheddar so I could thaw it to make another one later.

I also made a pot of spaghetti and meatballs, but I baked and flash froze the extra meatballs I made, I'd say @ a dozen. The next time I make spaghetti, I can drop the frozen meatballs into the simmering sauce and just heat them up. Prep work already done!

I also blanched and froze a plastic grocery bag stuffed full of rainbow chard I had picked up from the CSA - thank goodness I have a food saver!

Soon I'll be freezing quarts of applesauce - I love fall!

Wednesday, October 12, 2011

My freezer is empty

Well, ok, not completely empty. There are some bags of miscellaneous gravy, some acorn and butternut squash, a few quarts of chicken broth, and other various little bits of this and that. There are also a couple of packages of stew beef, a chuck roast, a rack of ribs and some raw chicken that didn't get prepped into anything. No more meals I can pull out at will, heat and serve - except for a whole sticky chicken that needs to be pulled out a day ahead of time to thaw before I can cook it. I'm rediscovering what a chore meal planning and prep can be on a daily and weekly basis. Can I say, for the record, that I do not like cooking from scratch every single day? How do you ladies do it?

Oh - I don't need to learn freezer cooking, I have my crock pot!  That's what I hear from people I talk to who don't freezer cook. That's fine. My crock pot is wonderful, I love it, too! But you know what? I still have to have all the ingredients on hand, and I still have to invest some prep time to get it up and running in the morning so that dinner is ready on time.

I first realized how much I had come to depend on my freezer meals the other day I was getting ready for a wedding. I had to be at the church at 4:30 for a 5:30 ceremony. My kids weren't going, and my husband was coming with me. This would have been the 3rd time that week I told my kids to fend for themselves for dinner - I just couldn't do it again! So I was multi-tasking trying to do my hair and brown ground beef to make sloppy joes at the same time. That's right - I didn't even have any of my usual packages of precooked ground beef!!

Ugh - never again. I'm beginning to work on cleaning out, organizing, and refilling my freezer starting today. The weather's turning colder - who's with me? Now's a great time to start!

Sunday, September 18, 2011

Freezing onions

No need to buy dehydrated minced onion in a shaker. Just chop up fresh onions and freeze them in 1/2 cup increments. All you need are the cheapie fold & close sandwich bags and baggie ties. Store them in a gallon freezer bag, and don't forget to label what they are. When you're ready to use them, just thaw and either sautee, or just add to you favorite recipes.
This is also a great way to avoid throwing out onions you didn't get around to using.

Wednesday, August 10, 2011

Sauteed Summer Veggies

Since joining a CSA this year, I've had a plethora of veggies in my fridge. Maybe I've been watching too much Anthony Bourdain recently, but I decided that good food needn't be difficult to prepare - and less is best. In fact, it's what you don't do to your food that makes the difference sometimes.

This dish you see pictured too 10-15 minutes to prepare, from fridge to table. It is all veggies that I got fresh from the farm yesterday. Try it! You cannot go wrong.

I ate the entire thing.

Sauteed Summer Veggies

1 Tbsp EVOO
1/2 red onion, halved & cut in wedges
1 purple bell pepper, seeded and sliced
3 cloves garlic, peeled and sliced
1 cup sliced zucchini
1 cup sliced yellow summer squash
1 cup sliced eggplant
1 medium tomato, cut into wedges
1 fist full fresh basil leaves
freshly ground salt & pepper to taste

Heat the oil on medium-high in a large saute pan. Add onion & cook for 1-2 minutes. Add peppers and garlic, continue cooking for @ 2 minutes. When onion is browned and starting to carmelize, add the zucchini, yellow squash, eggplant, salt & pepper. Reduce heat to medium, cook while turning for 2 minutes. Add tomato, stir and cover. Simmer for 3-4 minutes, add basil, stir and simmer for another 1-2 minutes.

You seriously cannot ruin this, and the times are only guidelines, as I didn't stand there watching the clock while I made it.

Let me know what variations you make! Enjoy!